Within this tutorial, you will learn more about how X3DOM, HTML and CSS are related, and how you can build powerful 3D applications
with well-known, conventional HTML and CSS mechanisms.
In the end of this tutorial you will get a short overview about how to use javaScript in your application.
As a starting point, we will simply use the HelloX3DOM.html example from the previous tutorial.
Copy it to another folder and name it something like HTMLEventsCSS.
We will now first take a deeper look at how X3DOM content can be manipulated via CSS.
You might have noticed that the X3DOM 3D context from the HelloX3DOM.html example
is a basically just a plain white area, surrounded by a black border. The 3D content is then drawn into this area.
X3DOM comes with a separate css file, since version 1.3 consistently named x3dom.css,
where all CSS definitions related to the X3DOM context and to some debug overlays can be found.
Let's say the style of your page uses gray and orange as its main colors.
To change the CSS default properties of X3DOM, you have a bunch of possibilities:
x3dom.css (External Style Sheet)style tag in your HTML document, after x3dom.css has already been included (Internal Style Sheet)style attributes of the corresponding elements (Inline Styles)style tag.
But, of course, any of the other possibilities will also do the job, and you should feel free to pick the way you like most for your purposes -
the last method (Inline Styles) is, however, usually not recommended.
To add some custom CSS code for the border of your X3DOM context, which is represented by the x3d element, insert a style tag
into the head of your HTML page, after the x3dom.css file has been included:
    <html>
    <head>
        <title>My first X3DOM page</title>
        <script type='text/javascript' src='http://www.x3dom.org/download/x3dom.js'> </script>
        <link rel='stylesheet' type='text/css' href='http://www.x3dom.org/download/x3dom.css'></link>
        <style>
            x3d
            {
                border:2px solid darkorange;
            }
        </style>
    </head>
    <body>
        <h1>Hello, X3DOM!</h1>
        <p>
            This is my first html page with some 3d objects.
        </p>
        <x3d width='600px' height='400px'>
        ...
        </x3d>

    </body>
    </html>
If you take a look at the result inside your browser, you should now see that the border around the X3DOM context has changed, according to our new CSS code.
Let's assume your page already has some orange and gray style, using a small tiled background image named pattern.png (example file available here).
Then the full style sheet might, for example, look like this:
    x3d
    {
        border:2px solid darkorange;
    }

    body
    {
        font-size:110%;
        font-family:verdana, sans-serif;
        background-image: url('pattern.png');
        margin: 3em;
        color: lightgray;
    }

    h1
    {
        color: darkorange;
    }
Try this CSS code with your example page now. The rendered result should look like the following:
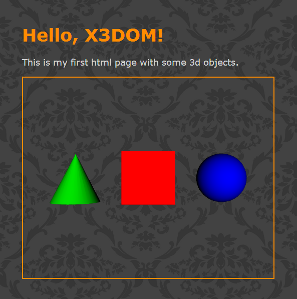
As you can see, the background of the HTML page, using the tiled background image with the gray stripes, is also rendered as a background for the X3DOM context.
This is a very important aspect: Your X3DOM scene will just render on top of the underlying HTML content, unless you specify something else.
Let's insert a semi-transparent background for the x3d element:
    x3d
    {
        border:2px solid darkorange;
        background: rgba(128, 128, 128, 0.4);
    }
The result should look like this:
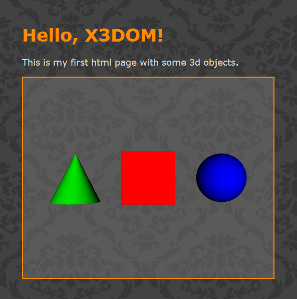
The X3DOM context now has a semi-transparent background, which is blended with the background of the page. As you can see, you can apply all the regular CSS transforms you like in order to make X3DOM fit into the design and layout of your Web application.
With HTML and JavaScript, you have a bunch of useful callback functions available on most kinds of DOM elements. X3DOM offers you similar functionality on its nodes. You can, for example, notify the user with a text message, as soon as the red box from our example has been clicked. To do so, install an onclick callback function on the shape which wraps the box:
    <shape onclick="alert('Hello, click!');">
        <appearance>
        <material diffuseColor='1 0 0'></material>
        </appearance>
        <box></box>
    </shape>
You can use JavaScript on every DOM element, so you are able to manipulate x3DOM nodes as you want. You already know how to use the onclick-event, let's try to change the color of the box by clicking on it. If you never used JavaScript before it might be a good idea to take a tour around w3schools first.
First give the node you want to change an id.
    <shape onclick="alert('Hello, click!');">
        <appearance>
        <material id="color" diffuseColor='1 0 0'></material>
        </appearance>
        <box></box>
    </shape>
<script>
     function changeColor()
     {
        if(document.getElementById("color").getAttribute('diffuseColor')=="1 0 0")
           document.getElementById("color").setAttribute('diffuseColor', '0 0 1');
        else
           document.getElementById("color").setAttribute('diffuseColor', '1 0 0');
     }
</script>
<shape onclick="changeColor();">
Especially if you have a large amount of model data, which you want to deliver on separate Web pages, it might be interesting to automatically generate the actual page, instead of coding it by hand. For purposes like this, you can use automated tools and mechanisms like XSLT, which allows you to directly transform an X3D document to an XHTML Web page. See here for an example maintained by the Web3D consortium.
You have now learned the basic concepts that connect HTML and CSS with X3DOM. In a later tutorial, you will learn more about x3DOM picking events, which will enable you to implement more complex interaction scenarios. For now, you should be able to create basic interaction on X3DOM elements, and you can style your X3DOM context, to fit ideally with your page design.
 Display example HTML file
 Download full example (.zip archive)